Kinesis Advantage360 Pro: My Setup & Workflow
How I configured my Kinesis Advantage360 Pro with the Colemak Mod-DH layout, custom macros, thumb clusters and mouse emulation to support a fully keyboard-driven workflow.
Why the Kinesis Advantage360 Pro?
When I decided to move beyond “just better ergonomics” and build a keyboard-driven development setup, I wanted hardware that could keep up. The Kinesis Advantage360 Pro (Adv360) stood out because it offers deep programmability, a split ergonomic layout, and the flexibility to map virtually every key to a behavior that supports my workflow.
In this post I’ll walk through how I’ve configured the board: from the hardware fundamentals to the firmware, the layout (Colemak Mod‑DH), and the custom macros and mouse emulation that let me stay fully in the keyboard zone.
Philosophy: The Keyboard as Thinking Environment
The Kinesis isn’t just hardware — it’s a thinking environment. Every remap, every macro, every layer is a small statement about how I want to interact with code — with minimal motion, maximum intent.
When you spend hours each day translating thoughts into text, the interface between mind and machine becomes critical. A poorly designed workflow creates friction at every step: reaching for the mouse breaks concentration, hunting for symbols interrupts flow, awkward key combinations strain both hands and attention.
But a thoughtfully configured keyboard becomes transparent — a direct channel from intention to implementation. The goal isn’t to memorize complex shortcuts, but to create an environment so intuitive that the tools disappear entirely, leaving only the work itself.
Hardware & Firmware Basics
- The Advantage360 is a split-keyboard design that allows the two halves to be positioned ergonomically, reducing wrist/shoulder strain and minimizing reach when shifting between keys.
- I use the ZMK-based firmware (via my forked repo at github.com/ragu-manjegowda/colemak-mod-dh-ansi) so I can control layers, mod-morphs, macros, and mouse emulation exactly how I want.
- The firmware build and deploy process sits entirely in my GitHub workflow, so updating keymaps or adding behaviors is version-controlled and reproducible.
Layout: Colemak Mod-DH
My primary typing layout is Colemak Mod-DH. I switched to it because:
- It reduces finger-lateral motion compared to QWERTY, easing strain on the hands and wrists.
- It keeps the arithmetic fingers (home row) active and balanced across both hands.
- Given the Adv360’s thumb clusters and configurable layers, I could fully exploit the layout’s benefits without sacrificing access to symbols, navigation, or macros.
This layout change from QWERTY to Colemak Mod-DH established the foundation that everything else builds upon.
What I Built: A Terminal-First Development Hub
My Kinesis Advantage360 Pro configuration transforms the keyboard from a typing device into a comprehensive development interface. Here’s what the setup accomplishes:
Colemak Mod-DH Foundation
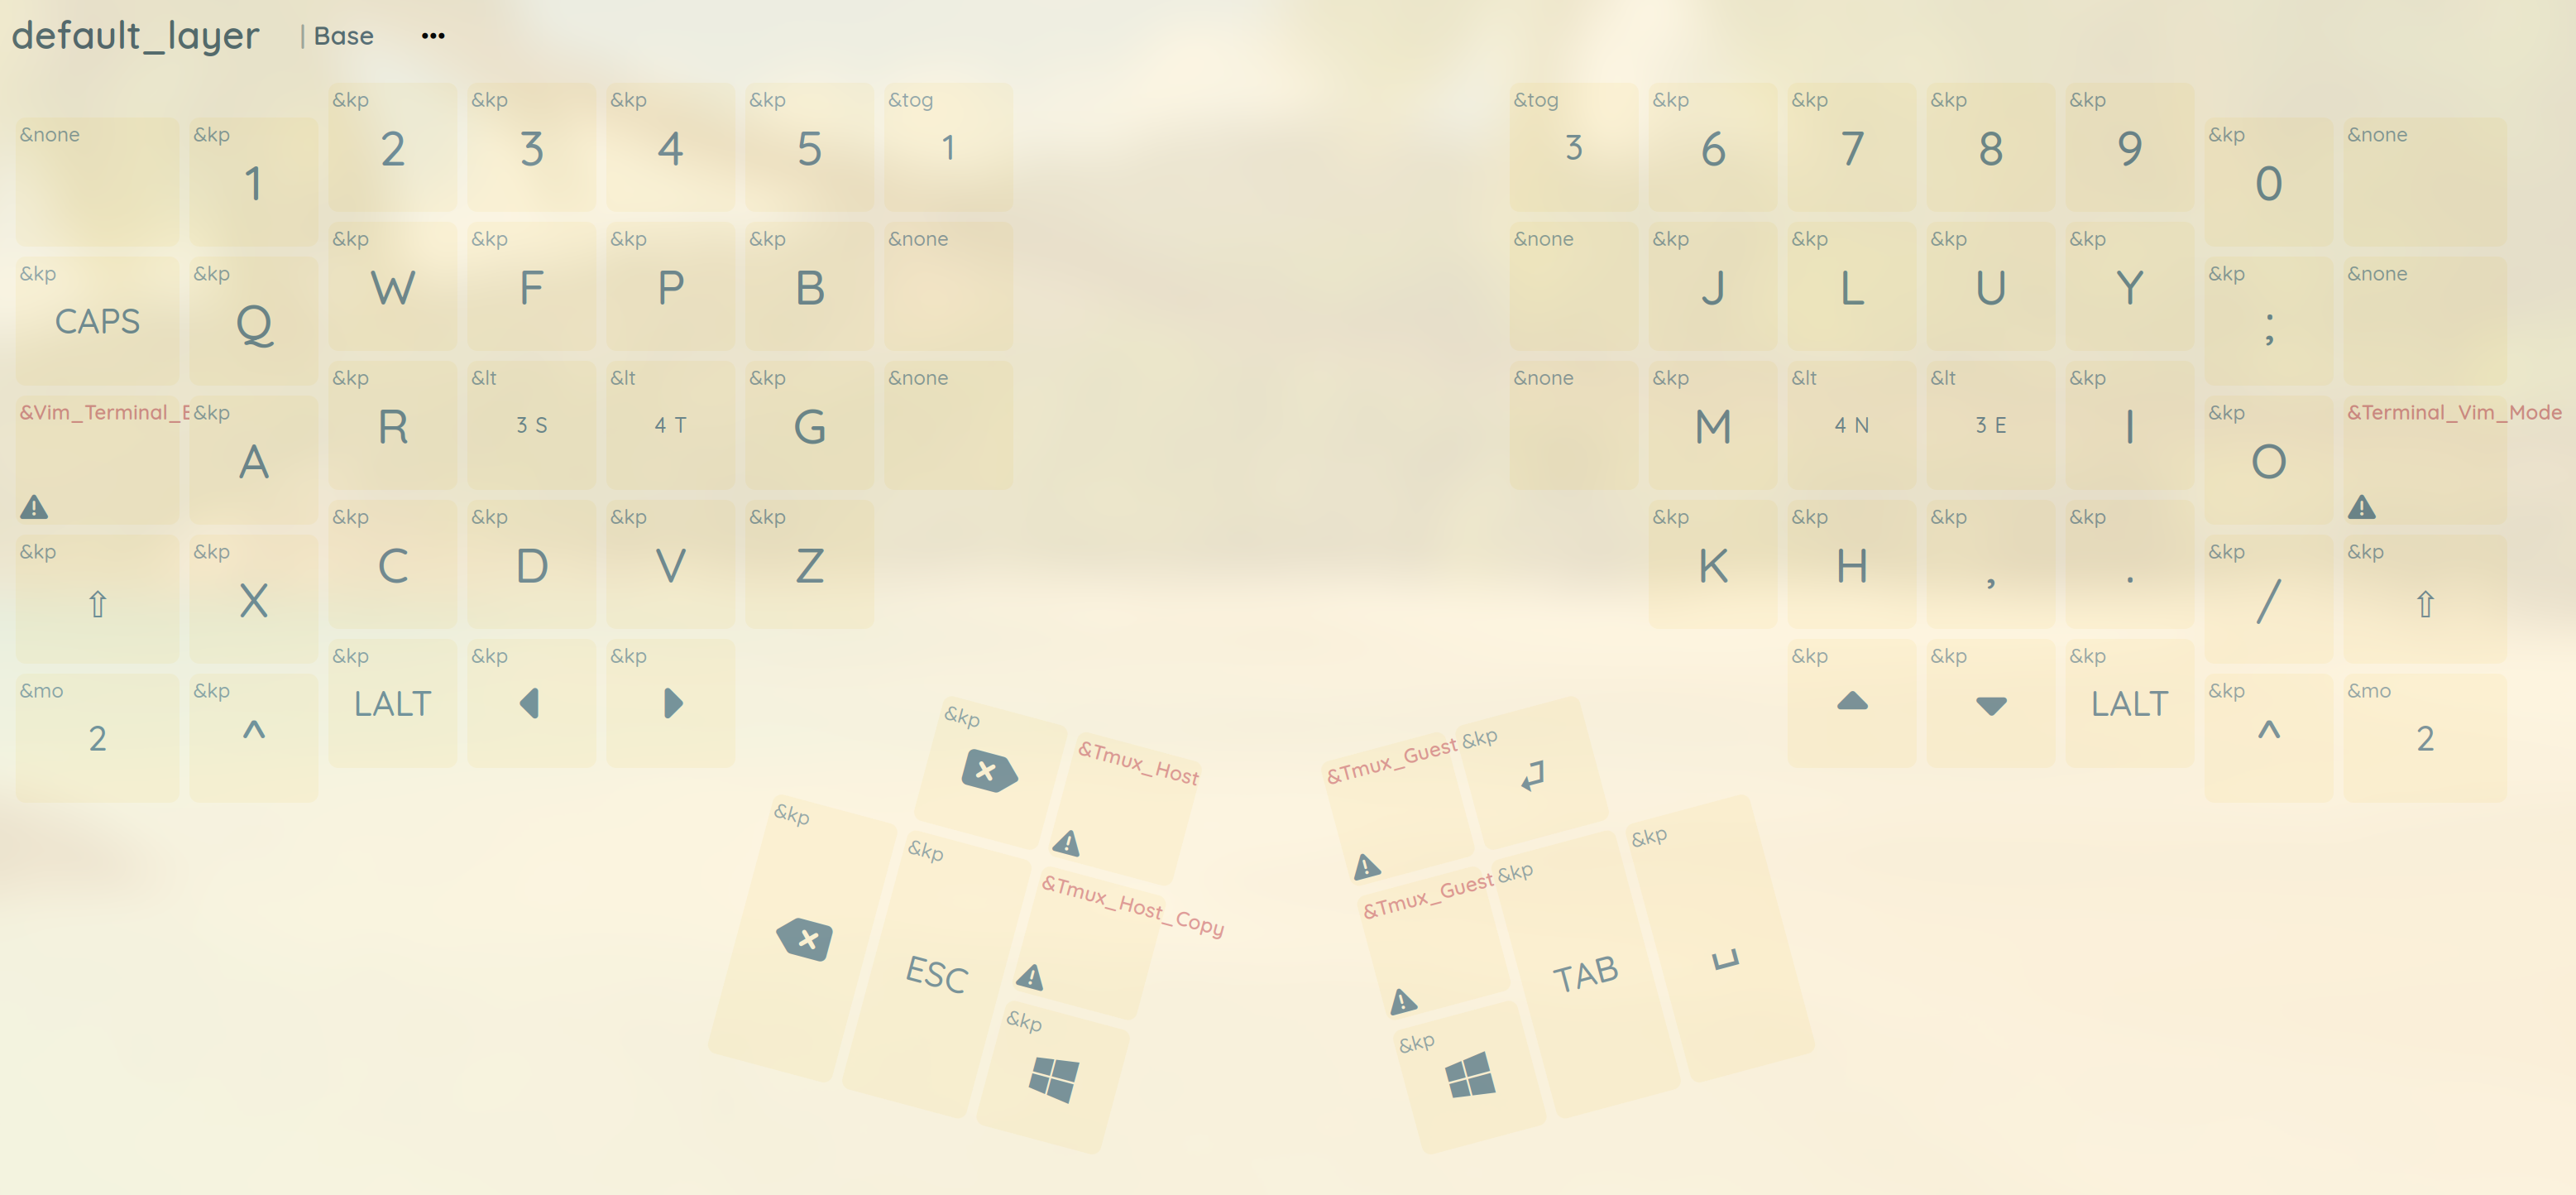
The base layer uses Colemak Mod-DH instead of QWERTY, reducing finger travel and balancing hand usage. This layout places the most common letters on the home row, making typing more efficient and comfortable during long coding sessions.
Complete Mouse Elimination
Full mouse emulation with 8-directional movement, clicking, and scrolling behaviors. The mouse layer lets me navigate GUIs, click buttons, and interact with visual elements entirely through key combinations. A fast movement mode handles quick traversal across large screens or multiple monitors.
Terminal Workflow Integration
Dedicated macros bridge the gap between terminal applications and the broader system:
- Terminal copy/paste: Single-key macros replacing the awkward Ctrl+Shift+C/V three-key combinations
- Tmux session management: Ctrl+B for host sessions, Alt+\ for guest sessions
- Vim terminal navigation: Ctrl+\ Ctrl+O to switch from terminal mode to normal mode in vim’s built-in terminal
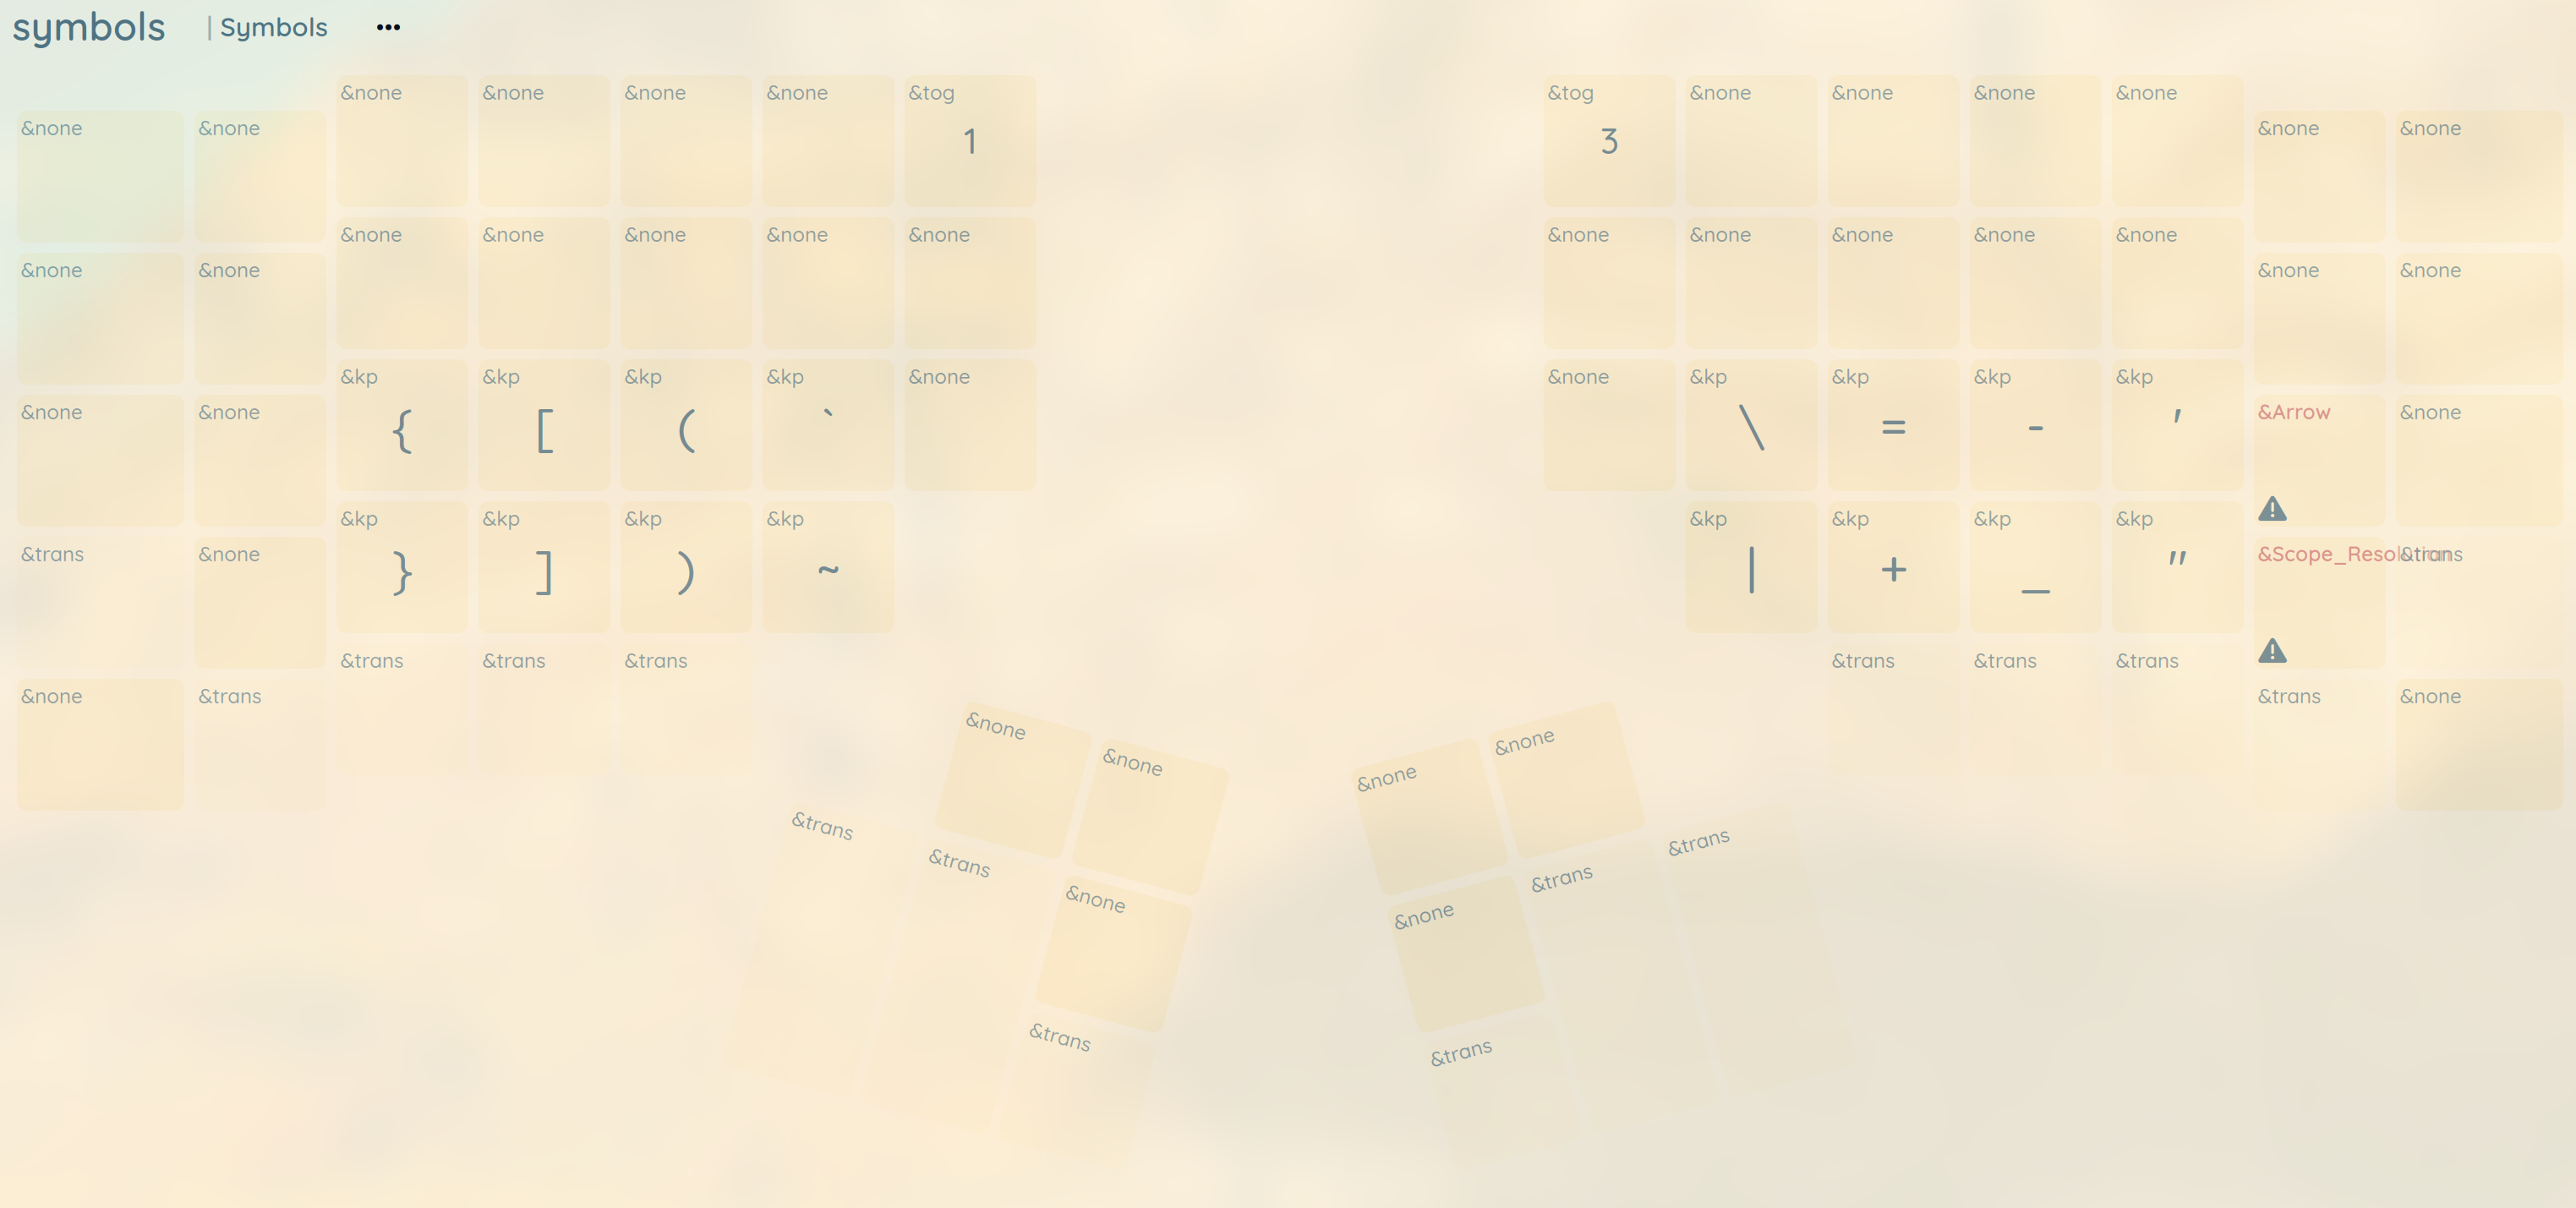
- Programming symbols: Quick access to
->,::, and bracket pairs with auto-cursor positioning
System Control Integration
Media and system functions are built into the keyboard layers:
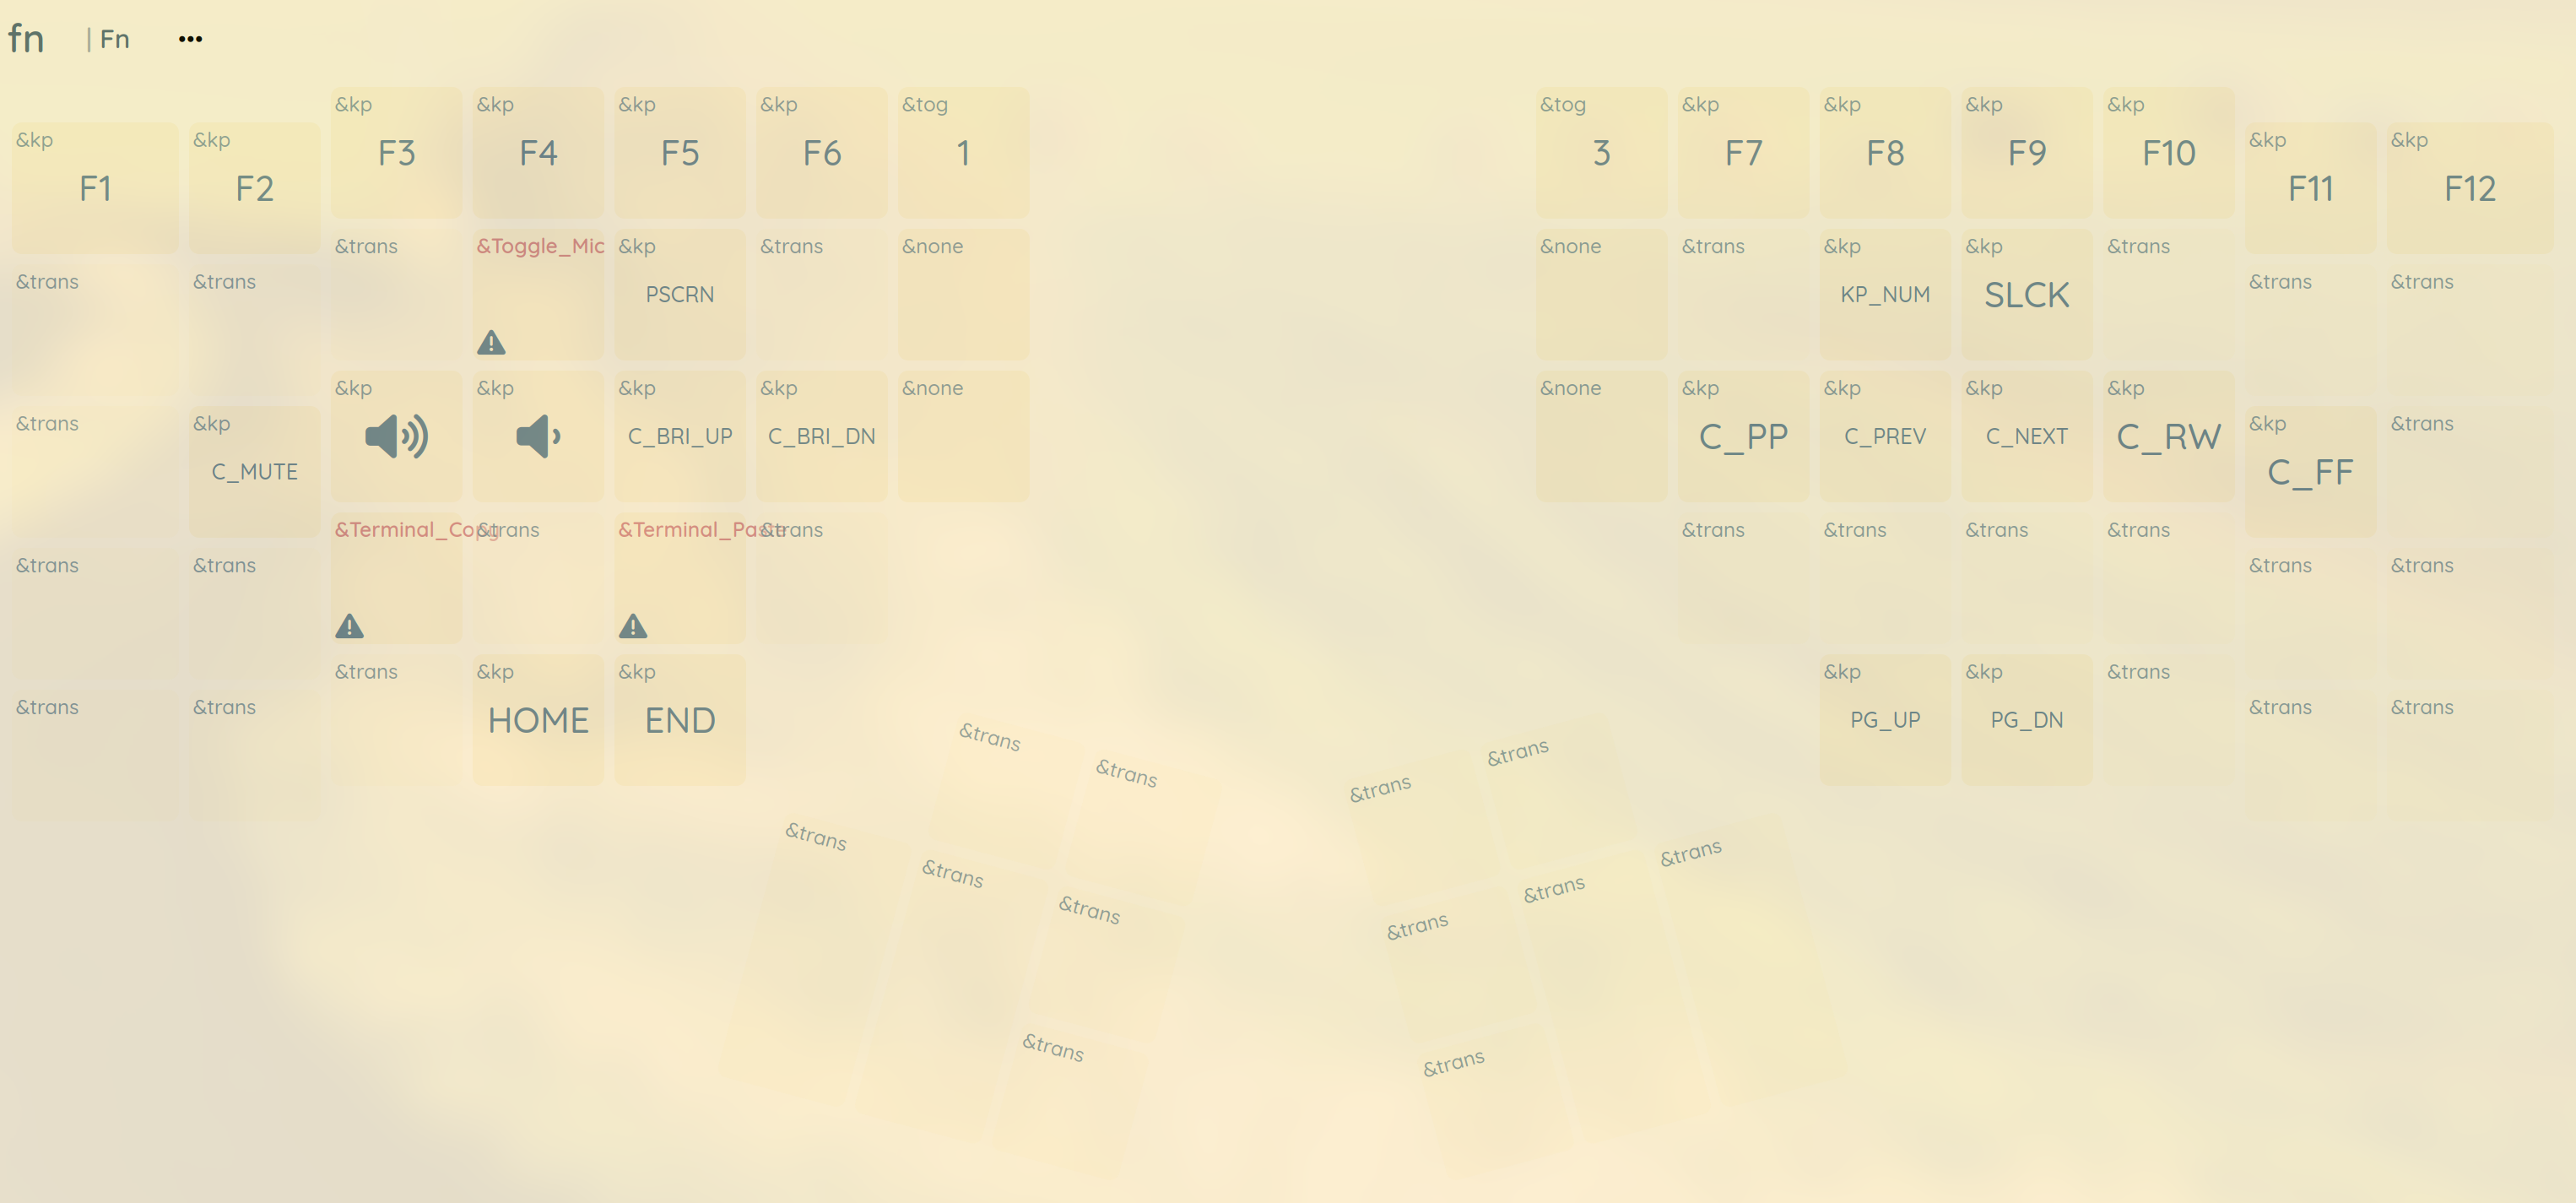
- Function layer: F-keys, volume, brightness, and media playback controls
- Cross-platform support: Separate macros for Windows and Mac operations
- Multi-device support: Optimized Bluetooth profile switching across devices
Ergonomic Layer Design
The 5-layer architecture keeps everything accessible without finger stretching:
- Thumb clusters handle layer switching and frequent functions
- Home row layer-tap behaviors (
lt 3 S,lt 4 T) provide instant access - Logical grouping where similar functions live in the same layers
Layer Architecture & Thumb Cluster Design
The keyboard is organized into 5 main layers, each serving a specific purpose in my development workflow:
Layer Structure
- Base Layer: Colemak Mod-DH typing layout with essential modifiers
- Keypad Layer (
tog 1): Numeric keypad for data entry and calculations - Function Layer (
mo 2): F-keys, media controls, and system functions - Mod Layer (
lt 3): Mouse emulation and navigation controls - Symbols Layer (
lt 4): Programming symbols, brackets, and special characters
Visual Reference: All Layers
Base Layer - Colemak Mod-DH
Function Layer - Media & System
Modifier Layer - Mouse & Mod Keys

Symbols Layer - Programming Symbols
Thumb Cluster Strategy
The thumb clusters handle the heavy lifting of layer switching and frequently-used functions:
- Left thumb: Backspace, Escape, GUI key for window management
- Right thumb: Tab, Space, and layer toggles for quick access
- Bilateral layer access: Both splits have layer-tap functionality -
lt 3S andlt 4T on the left,lt 3E andlt 4N on the right, providing instant access to Mod and Symbols layers from either hand - Modifier redundancy: Control, Alt, and Meta/GUI keys are available on both splits, ensuring I never have to stretch across the keyboard for key combinations
Workflow Integration
This layered approach integrates deeply with my terminal-based workflow:
- Tmux integration: Custom macros for host (Ctrl+B) and guest (Alt+\) tmux sessions
- Vim terminal navigation: Ctrl+\ Ctrl+O to switch from terminal mode to normal mode in vim’s built-in terminal
- Command editing: Ctrl+X Ctrl+E to open
$EDITORfor editing lengthy terminal commands - Terminal operations: Single-key macros eliminating complex Ctrl+Shift+C/V combinations
- Mouse emulation: Full GUI navigation without leaving the keyboard
- Programming symbols: Quick access to
->,::, and bracket pairs with auto-cursor positioning - Window management: Meta/GUI keys on both splits enable instant AwesomeWM navigation - tiling, workspace switching, and application launching without leaving the home row
The bilateral design means I can access any layer or modifier from either hand, eliminating awkward hand positions and maintaining flow regardless of which hand is free. This becomes especially important when managing complex window layouts in AwesomeWM (covered in detail in another post in this series).
A Day in the Keyboard-Driven Life
Here’s how the configuration supports a typical development session:
Starting Up: I press the keypad toggle and use the numeric layer for any calculations. Then back to the base layer for coding.
Terminal Work: When I need to copy terminal output, I hit my Terminal_Copy macro with a single key press instead of the awkward Ctrl+Shift+C three-key combination. Same for Terminal_Paste replacing Ctrl+Shift+V. Since I’m constantly copying command outputs, error messages, and file paths in terminal-based development, eliminating this finger gymnastics significantly reduces hand strain.
Tmux Sessions: I manage nested tmux sessions with dedicated macros - Ctrl+B for the host session and Alt+\ for the guest session. Copying between sessions uses Ctrl+B [ and Alt+\ [.
Vim Terminal Mode: When using vim’s built-in terminal (:terminal), Ctrl+\ Ctrl+O switches from terminal mode to normal mode, letting me navigate and treat the terminal as a regular vim buffer.
Command Editing: For lengthy terminal commands, Ctrl+X Ctrl+E opens my $EDITOR (vim) to modify the command before execution - much easier than trying to edit complex commands on the command line.
GUI Navigation: For web browsing or GUI applications, I switch to the Mod layer and use the mouse emulation keys to click, scroll, and navigate without touching a physical mouse.
System Control: Media controls are always accessible through the function layer - volume, brightness, and audio controls integrated into the thumb clusters.
The result: Every interaction happens through deliberate key combinations rather than context-switching between keyboard and mouse.
Implementation Notes
Layer Transitions: The lt (layer-tap) behaviors on S, T, E, and N keys mean I can hold them for layer access or tap for normal letters. This keeps layer switching fast and intuitive.
Macro Design: Each macro serves a specific workflow need rather than being a general shortcut. The tmux, vim, and terminal integration macros eliminate the most common friction points in my development process.
Mouse Emulation: The smart_mouse.dtsi configuration provides both precise and fast cursor movement modes, making GUI interaction practical without physical mouse hardware.
Cross-Platform Support: Separate macros for Windows and Mac operations ensure the keyboard works consistently across different systems while maintaining the same muscle memory.
Final Thoughts
The Kinesis Advantage360 Pro became the foundation for eliminating every source of friction in my development workflow. What started as an ergonomic improvement evolved into a complete input system that integrates seamlessly with terminal-based development.
The key insight: every interaction should be deliberate and fast. Rather than learning hundreds of arbitrary shortcuts, I built a logical system where similar functions live in the same layers, macros solve real workflow problems, and muscle memory develops naturally.
This configuration isn’t just about avoiding the mouse - it’s about creating an environment where the tools disappear and you can focus entirely on the work itself.